Walkthrough Guide

Néro & Sci ∫ Integral Edition (Démo) 

Library

Objective 1 – Talk to Psyga on the 3rd floor of the library

When you start the game, you’ll appear outside the library. Move to the right to enter. Speak with the guard at the entrance — he’ll tell you that Psyga is waiting for you on the 3rd floor. Continue to the elevator and use the + button to go up to the 3rd floor. There, you’ll meet Psyga, the director of the library. He will ask you to go clean the library’s basement.


Objective 2 – Clean and explore the library basement

After talking with Psyga, head down to the basement. To do so, use the elevator with the button. If you’re in a hurry to start cleaning, feel free to jump into the void — you’ll never lose a life from falling in this game! Then, clean the library areas that need it. You can spot them using the button prompt displayed on the screen when you walk by. In front of a bookshelf, you’ll knock down a purple book and release Sci. The adventure begins here!


M1_00 | Tutorial

In this level, you’ll discover the beginning of the game’s story. You’ve just knocked over the Book of Chaos Theories, causing the library floor to collapse. Now, you must find your way out of the caves. Along the way, you’ll learn the controls and unlock abilities for both characters. Explore the level to your right. The first ability you’ll find is Néro’s double jump. It allows you to jump higher or recover when you fall or slip. Keep exploring the level to the right.

Keep moving forward and you’ll learn how to use Sci to move objects such as blocks in order to open doors. Here, you must move the small square onto the pressure plate on the left to open the door.

Note: If you want to play in co-op mode, Player 1 controls Néro for platforming and combat, while Player 2 controls Sci, who can grab objects or block enemies (an ability unlocked later). To play this way, plug in a second controller or give the mouse to Player 2 to control Sci.

After this door, you’ll unlock Sci’s new ability: the White Dimension. This special skill allows you to see a simplified version of the world and spot hidden clues.

Keep moving forward and you’ll encounter the first puzzle of the game. In this puzzle, you’re facing four levers, each with a different shape above it. The goal is to activate the levers in the correct order.

Use the White Dimension to reveal new clues. You’ll see the code 3564, meaning you must activate the levers in that exact order to open the door. The shapes above the levers are polygons with different numbers of sides — for example, the triangle has 3, the square has 4, the pentagon has 5, and the hexagon has 6. Activate them in the order shown in the White Dimension to unlock the door.

Warning: There’s an enemy waiting behind the door. Defeat it using the attack button, just as you did when activating the levers.

In the next section, you’ll learn that Sci can also use objects to help you jump higher when the double jump isn’t enough.

Note: When Sci grabs an object, she can also use it to block an enemy and prevent it from attacking Néro. Only Néro can pass through objects held by Sci — this design choice prevents you from getting lost in the levels.

Use the large square block to move through the rest of the level until you reach the exit. The exit is marked by a door — simply jump into it to leave the level. The game automatically saves your progress each time you exit a level.

W1 - 01 - First step toward the adventure

From now on, you’ll explore the Frozen Caves levels and solve puzzles to unlock doors and complete each stage. Remember to talk to the characters you meet — they may tell you a story or ask for your help with a side quest. Collect Light Coins along the way; they can be used to upgrade Néro & Sci’s platforming abilities.

Start exploring the level and you’ll meet your first friend. After talking to them, a “Select!” icon will appear — this means you’ve unlocked the character, and they’re now available in the Compendium menu.

Note: If you unlock all friends in World 1, you’ll gain access to two bonus levels.

As you continue your journey, you’ll meet Lantern, a unique character. He doesn’t tell stories — instead, his words and quotes are intentionally cryptic, meant to make you reflect on the meaning of life.

Then, continue your path until you reach the first puzzle of the level.

Here is the first puzzle of this level, which you must solve to move forward. If you need a hint, collect apples — they allow you to ask Sci for an additional clue in case you get stuck. Sci will always give you hints to help you solve the puzzle, but never the full solution!

Here, you can see several blocks that Sci can move. One block is on a pressure plate, another is in front of an enemy, and six more are behind a door. A second enemy stands in front of a lever that unlocks the door containing the six blocks.

In the background, you can also spot representations of blocks that cannot be moved.


Enter the White Dimension to understand how this puzzle works. In the flipped world, you’ll notice a + sign between two shapes.

After exploring the White Dimension, you’ll see that the left side of the screen is an example: 2 + 1 = 3. In the center lies the actual puzzle: 3 + 3 = ?.

To solve the puzzle, you need to unlock the door in front of the movable squares on the platform. Go up to the top-right and activate the lever to open the door.

Then place 6 blocks on the pressure plate (3 + 3 = 6) to complete the puzzle and continue on your way.

Behind the door that just opened, you’ll find a panel with a floppy disk symbol. A small sound will play as you pass by — this means you’ve reached a checkpoint!

Checkpoints automatically save your progress — including your score, unlocked abilities, and collected Light Coins. If you quit the game and return to the level from the world map, you’ll respawn at your last checkpoint.

However, you won’t be able to go back. Previous doors will remain closed to prevent you from getting lost by backtracking.


After the checkpoint, continue to the right. At the top, you’ll find a small ledge with a new friend to unlock. Once you talk to them, you’ll be able to find more information about this character in your Compendium.


Below, you’ll find a block that will help you climb higher in the level. Grab the block with Sci and use it to reach the next puzzle.

You now find yourself in front of a new puzzle and a character to unlock.

Note: To unlock certain characters like this one, it’s not enough to simply talk to them. You must speak with them first, then either solve a puzzle beforehand or complete the side quest they assign you. Once the condition is met, a “!” symbol will appear above their head. Talk to them again to unlock the character.

In this puzzle, you’ll see a number (36) and several levers above a formula that doesn’t match the result: 6 × (2 (4)).

Activate the levers until the formula becomes 6 × (2 + 4) = 36. Once you get the correct result, the next door will open.

Once you’ve solved the previous puzzle, you’ll enter a new section. Explore the upper part of this area to find and talk to a new character. Next to them, you’ll find a Light Well — a small bush filled with Light Coins, which can be used to purchase skills in the Compendium.

Note: Light Wells can only be used once. If you want to collect more coins, you can replay a level. Only the coins dropped by enemies and those placed in the environment can be collected again.

Be careful: enemies can make you lose coins, so try to anticipate their attacks!

Then, head down to the lower part of this section to continue. There, you’ll find a yellow sign that explains how to upgrade your skills.

If you open the Skills menu, you can see how many Light Coins you currently have and click on the white nodes to purchase new abilities.

In this example, this ability costs 25 Light Coins. Click on it to buy it! You’ll be able to upgrade it later. Then, continue your journey toward the next puzzle!

/!\ Challenge during the Steam Next Fest (October 2025): There aren’t enough levels to naturally unlock all the available skills in World 1. Replay every level until you’ve unlocked as many skills as possible, and send us a video capture of your Skills MenuThe first player to unlock every skill will win a key for the full game!

As you continue, you’ll come across the third puzzle of the level, which you’ll need to solve to progress. A purple sign indicates that you’ll find clues in the White Dimension. You can also get a hint from Sci by collecting the nearby apple.
 

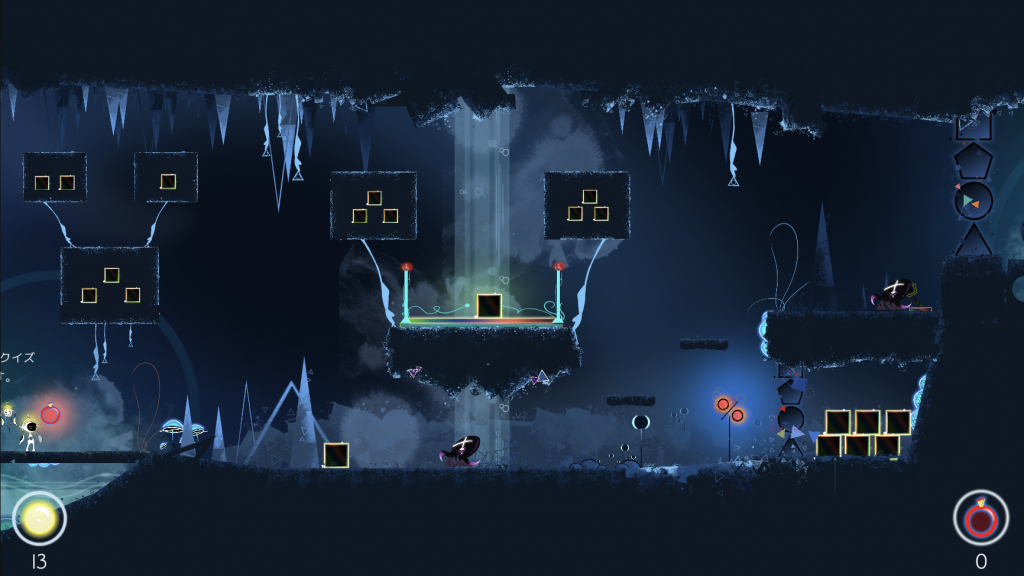
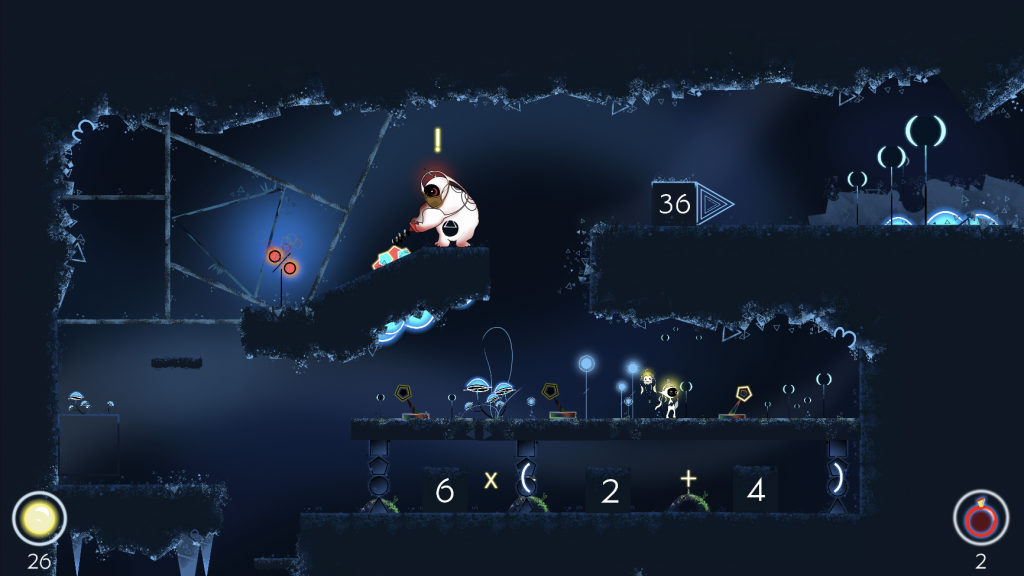
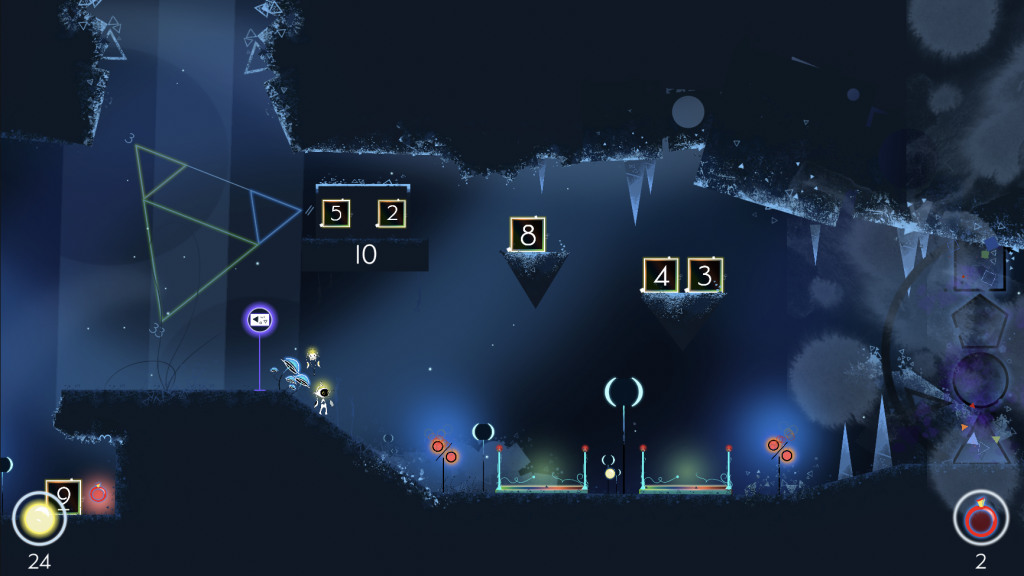
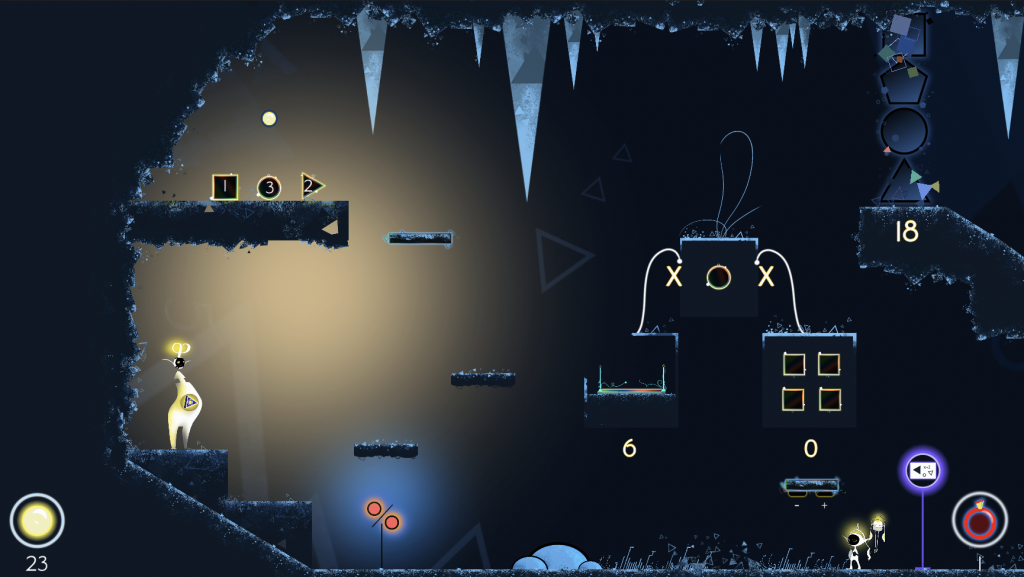
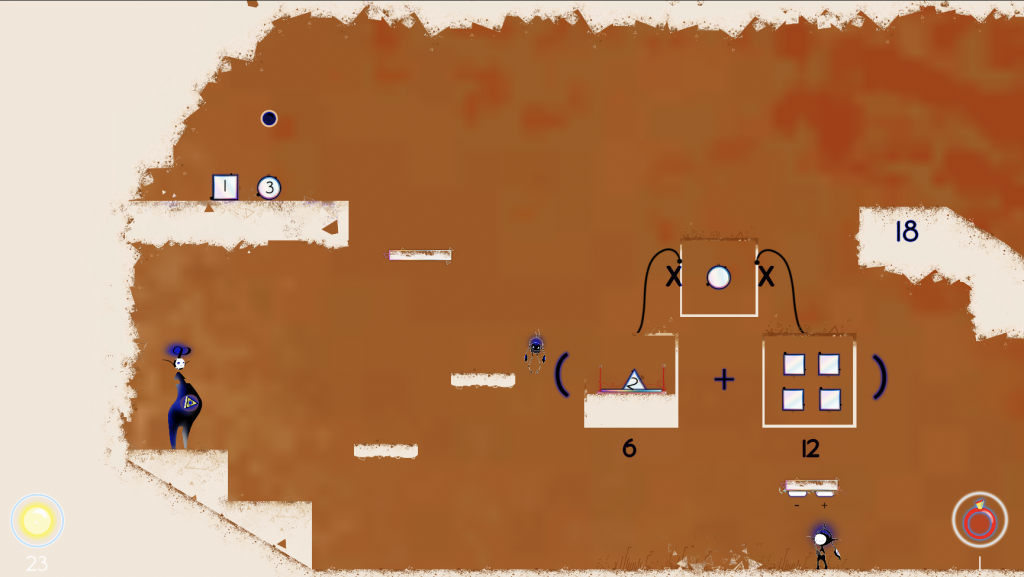
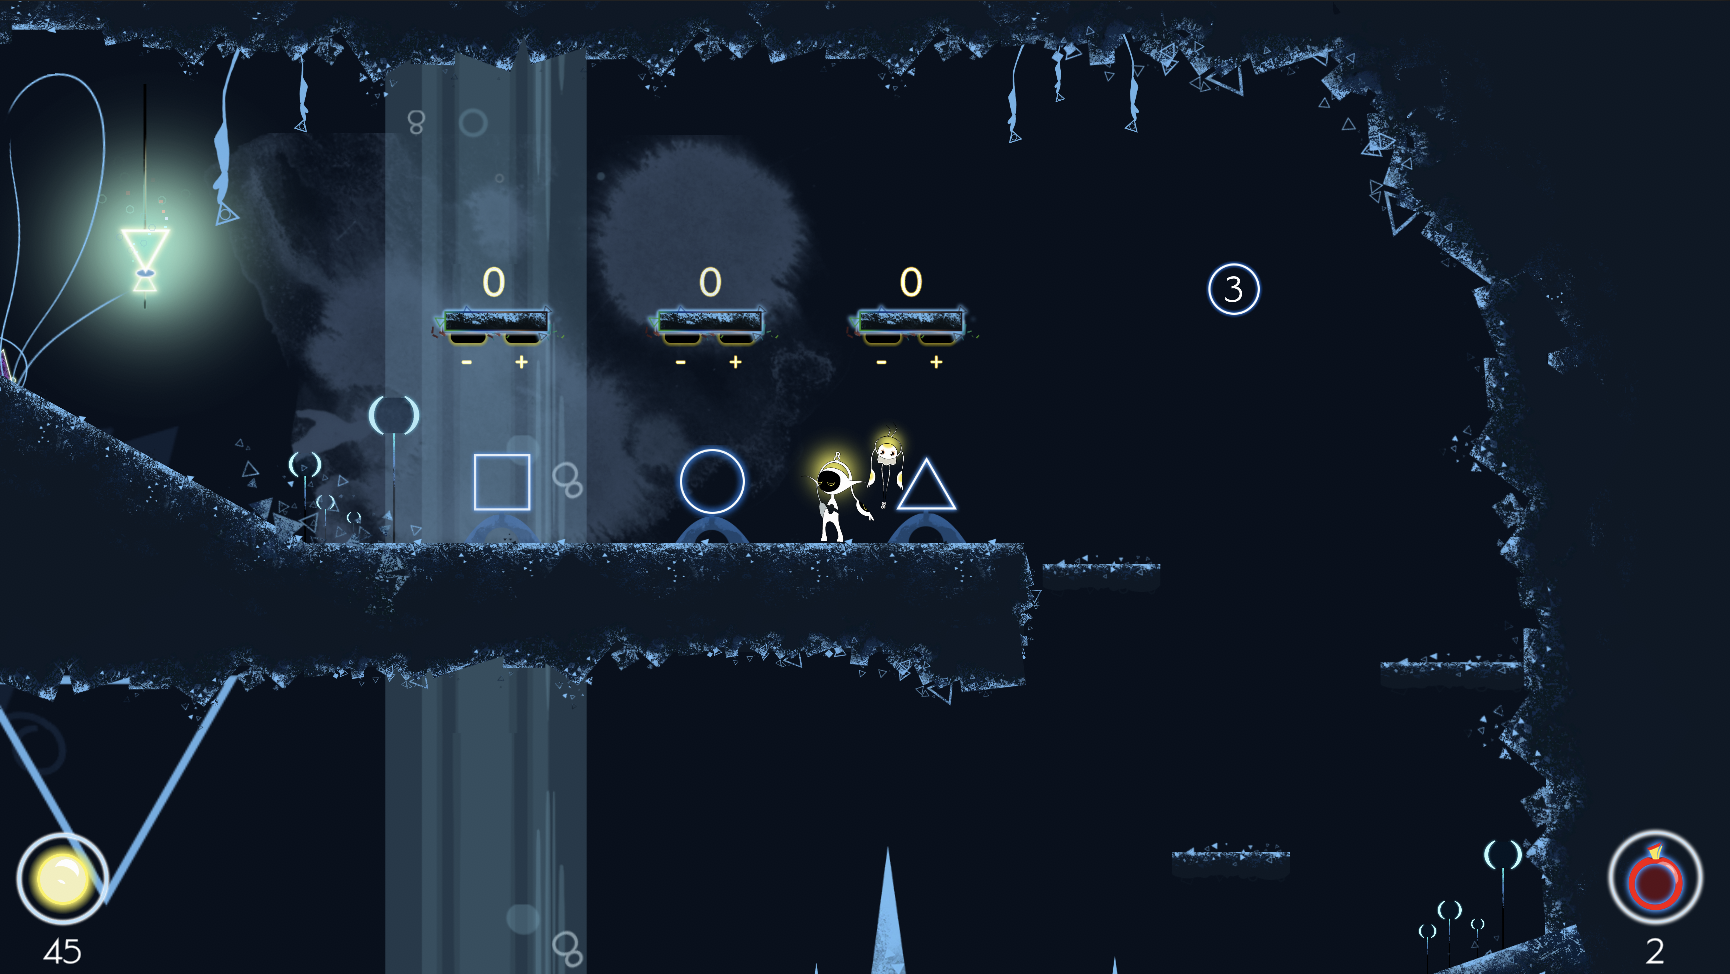
In this puzzle, you’ll find four blocks that Sci can move (9, 8, 4, and 3) onto pressure plates. You need to find the correct combination. One example shows two blocks (5 and 2) above the number 10. When you activate the White Dimension, you’ll see the formula 5 × 2 above the number 10, as well as a × symbol on each pressure plate. Below the left pressure plate, you’ll see the number 27, and below the right one, 32. From this, you can deduce that you need to follow the example 5 × 2 = 10. To solve the puzzle, place the blocks to create 9 × 3 = 27, then 8 × 4 = 32.

After solving the puzzle, you can finally finish the level by going through the exit door!

At the end of each level, you’ll see a summary of your performance — the number of extra coins you collected, whether you found all your friends, and the mathematical theories you unlocked, which are now available in your Compendium.

W1 - 02 - Geometry of the cavern

In this level, you’ll meet a character who asks for your help to find their four lost gemstones. This is a side quest that allows you to unlock this character. You must find all four gemstones and place them on the pressure plate to free them.

Head to the right to find the first puzzle and start searching for the first two stones.

Quest: One gemstone is located on the pressure plate, another nearby on a platform to the left of the character, a third one up to the right after solving the next puzzle, and the last one near a path descending to the left after the second puzzle of the level. Once you’ve found them all, a door will unlock, allowing you to collect Light Coins.


In this first puzzle, you’ll see platforms labeled 360°, 90°, and 60°, along with a square shape placed above three pressure plates. There are three blocks scattered around this area: a square, a circle, and a triangle.

The goal of this puzzle is to place each shape on the correct pressure plate. The first clue tells you to place the square on the middle plate, beneath the platform marked 90°. From this, you can deduce that 90° corresponds to the square, 60° to the isosceles triangle, and 360° to the circle.

Place each shape on the correct pressure plate to activate the moving platforms and continue your exploration. Then, take the path at the top left to reach the second puzzle.

The second puzzle of this level is a logic-based puzzle. To solve it, you’ll need to analyze the scene carefully. There’s an enemy, two shapes that Sci can take (a diamond and a right triangle), and on the pressure plate, there’s a right-angle symbol.

To open the door, simply place the right triangle on the pressure plate, since it’s the only one of the two shapes with a right angle.

To open the door, simply place the right triangle on the pressure plate, since it’s the only one of the two shapes with a right angle.

In the next section of the level, you’ll meet a new character who will give you a quest. The large wheel is stuck, and you’ll need to unblock it. To do this, use the platforms to move to the right and reach the next puzzle.

Note: Once you’ve solved the puzzle, don’t forget to go back and talk to the character again to unlock them.

The third puzzle of this level is located on the other side of the large wheel. You’ll find a purple sign indicating that you need to look for clues in the White Dimension, two platforms labeled A and B with enemies you can’t attack, two pressure plates, and two -/+ buttons labeled A and B.

When you activate the White Dimension, you’ll see the // symbol (meaning “parallel”) along with two labels showing 20°. These are the values you must set using buttons A and B so that the two bridges become parallel.


After setting the correct values on the -/+ buttons, the enemies will climb onto the segments to reach the pressure plates. Then, a new door will close in, trapping the enemies and blocking them. This action will open the door leading to the next character.

Talk to this character, then hit the lever. The large wheel will start turning, and you can go back to speak with the character near the wheel. You can either take the path on the right or return the way you came.

Next, use the large wheel to reach the upper left area and solve the final puzzle of the level. This one is optional, but completing it will reward you with Light Coins.

This final optional puzzle will allow you to earn Light Coins. You’ll see a lone character in the center, several shapes locked behind a door at the top of the screen, a pressure plate below a square, another below two triangles, and a lever that needs to be activated.

In the White Dimension, you’ll notice that on the left pressure plate, you need to recreate the example of a square placed on the perpendicular sign, and on the right pressure plate, you must place a triangle so that the two triangle angles are parallel.

Once both shapes are placed correctly, talk to the character again to unlock them. Then, backtrack and take the path above the large wheel.

Use the square block to climb up the path leading to a lever that will unlock the door to the next part of the level.

Then, reuse the square block to reach the path on the left, which will lead you to the level’s exit.

Jump into the door to finish the level!

M1_03 | Dividing waterfall

This level is made up of several sections where you’ll need to stay observant in order to solve the puzzles. First, collect Light Coins by defeating enemies and using the Light Well found in the first area of the level. Then, take the path to the left to access the rest of the level.

In this level, you’ll need to remember numbers you encounter along the way. The first one you’ll find is the number 1 inside a triangle, located just above a Light Well.

Continue climbing the platforms until you reach the first puzzle of the level.

In this puzzle, you’ll find 6 squares inside a box visually connected to 3 pressure plates, and 2 triangle blocks in another box connected to 2 pressure plates. When you activate the White Dimension, you’ll notice ÷ symbols under the pressure plates. You’ll also see the number 6 above the first three plates and the number 2 above the next two.

You’ll realize this puzzle is about division. You need to distribute the 6 squares and 2 triangles evenly across the pressure plates below:  

  • 6 squares ÷ 3 pressure plates = 2 squares per plate.

  • 2 triangles ÷ 2 pressure plates = 1 triangle per plate.

Once the blocks are correctly placed, the door will open, allowing you to continue to the right.

In the next section of the level, you’ll need to pick up a square block and place it on a pressure plate. After that, you’ll be able to meet a character located on the left.

Talk to this character, who will thank you for clearing the path that allows him to visit his brother, visible on the left side of the screen. Then, head back to the right and take the upper path, continuing to the left until you reach the next puzzle.

In this new puzzle, look on the left side of the screen — you’ll see shapes: a square with the number 1, a circle with the number 3, and a triangle with the number 2. On the right side, there’s the number 6 below a pressure plate that must hold one of these shapes, four squares placed above two -/+ buttons, and the number 18 displayed under the door you need to open. You can also see several × (multiplication) symbols.


In the White Dimension, you’ll notice it’s a bracketed formula where two variables must be added together.

To solve this puzzle, understand that circles are worth 3, squares are worth 1, and triangles are worth 2. First, there’s an initial calculation: ❍ × ❒ = ?. So 1 ❍ valued at 3 × 4 ❒ valued at 1 = 3 × (4 × 1) = 12. Enter the result using the -/+ buttons.

Next, determine which shape to place on the left pressure plate. You need to multiply that shape by 3 (the circle’s value) to get 6. Since 2 × 3 = 6, place the triangle on the left plate. In other words, you’re solving: 

(❍ × △) + (❍ × 4 ❒) = (3 × 2) + (3 × 4 × 1) = 6 + 12 = 18.


Once you’ve solved the previous puzzle, climb the platforms and take the path to the right until you can jump down to reach the large wheel that just activated. Speak to the character located above the first puzzle you encountered.

Now that the large wheel is running, you can reach a small ledge to its left. There, you’ll find a square marked with the number 5. It’s time to head to the next puzzle.


Go back to the right-hand path from the first puzzle you solved to reach the next puzzle.

Take the path that climbs upward using the platforms, and you’ll reach a junction with a platform on the left decorated with blue mushrooms. Follow that path and head to the right. After jumping across a few platforms, you’ll arrive at the next puzzle, where you’ll see the number 3 inside a circle, along with three -/+ buttons below the square, circle, and triangle icons.


Remember the shapes you spotted along the way: 1 in a triangle, 5 in a square, and now 3 in a circle. Use the buttons to set the corresponding numbers beneath each shape to open the door and talk to the last friend in the level.

Go back the way you came and jump into the hole beneath the large wheel. There, you’ll reach the final puzzle of the level. In this section, you’ll learn how to use the scale, which allows you to compare two values and create fractions (or divisions) using blocks placed in each basket.

To solve this puzzle, you’ll find several round blocks in this section, each marked with a number: 5, 1, 2, and 6. You’ll also notice a clue nearby — the number 0.5.

You’ve probably guessed it — using the scale, place the circle marked 1 on the left and the circle marked 2 on the right to create 1 ÷ 2 = 0.5.

Once you’ve entered the correct answer, the final door will open, leading you to the exit.

Game developper: